Friday, June 29, 2007

Chicken and Lemon Spaghetti Carbonara


Traditionally, I am not one for creamy based pasta sauces. In fact, I never order them. Not only do they usually contain loads of calories, but they are just too heavy and rich for me. However, when I saw this recipe for spaghetti carbonara in the vol4 , issue 5 of Delicious magazine, it looked like it was none of these things. Sure it has some cream and eggs, but it wasn't drowning in gross amounts white, claggy sauce. So I decided to take a punt and try it.

And I was pleasantly surprised. I don't think this is something that I would eat every week, but as a special treat, it was great. Hubby raved about it and said it was extremely tasty, and he is a very picky eater. The lemon in the recipe really gave it a kick and the pancetta was lovely and salty. I definitely recommend this recipe for Carbonara.


Chicken and Lemon Spaghetti Carbonara
(serves 4)

2 tbs extra virgin olive oil
2 chicken breast fillets
450g dried spaghetti
175g smoked pancetta, cut into thin strips
4 sage leaves, chopped
2 large eggs plus 2 egg yolks
100ml thickened cream
finely grated zest of one lemon
50g unsalted butter
100g aged parmesan cheese, finely grated

1. Heat half of the oil in a small fry pan over medium heat. Season the chicken and then cook for 6 minutes on either side, or until cooked through. Transfer to a plate and cover loosely with foil.

2. Cook spaghetti according to packet instructions. Whilst the pasta is cooking, heat the remaining oil and cook the pancetta for 3-4 minutes until lightly golden. Stir in the sage, then remove from the heat.

3. Cut the chicken into small pieces. Lightly beat the eggs, egg yolks, cream and lemon zest in a small bowl. Drain the spaghetti, then return to the saucepan, off the heat. Immediately add the pancetta, egg mixture, chicken, butter and 2/3 of the parmesan cheese. Toss with some fresh ground black pepper...the residual heat from the spaghetti will produce a smooth, creamy sauce.

4. Serve immediately and sprinkle with remaining parmesan.

Thursday, June 28, 2007

Grilled Eggplant Stack


This is a lovely summer meal that is especially great for this time of the year...squash season. When I went to the farmers market last week, they seemed to be practically drowning in squashes!! I availed myself of a few of them, but I'm sure my purchase was just a drop in the ocean of squashes that were there.

You could serve this dish as a cute appetizer, but we had it as a main, served with salad. Either way, its healthy and delicious. I used baby eggplant, but it would better if you could find the larger kind. This recipe again has goat's cheese, which seems to be creeping into almost every meal I make lately....but its so yummy, I don't see an end to it soon :). If you like grilled vegetables, then I suggest making an extra batch whilst you are doing this recipe, because they are super tasty fresh off the grill and you could use them later in sandwich's or just on their own. Lovely and sweet.

The recipe is from this month's issue of Cooking Light and only has 117 calories per serve. Yum!!


Grilled Eggplant Stack
(makes 4 stacks)

1 (1 pound) eggplant, cut crosswise into 1/2" thick slices
3/4 tsp salt, divided
1/4 cup balsamic vinegar
1/4 cup dry red wine
1 tbs brown sugar
1 small zucchini
1 small yellow squash
1 large red bell pepper, quartered lengthwise and seeded
1 tsp olive oil
1/4 tsp fresh black pepper
1/4 cup (2oz) goat's cheese
1 tbs fresh chopped basil
1 tsp fresh chopped oregano

1. Place eggplant slices in a colander and sprinkle evenly with 1/2 tsp salt. Toss well and let stand for 10 minutes. Rinse thoroughly and dry with a paper towel.

2. Combine vinegar, wine and sugar in a small saucepan over medium heat. Bring to a boil, then simmer until reduced to 1/4 cup (about 8 minutes).

3. Prepare the grill. Trim ends from the zucchini and yellow squash. Slice each lengthwise into 4, 1/4" thick slices. Flatten the pepper with your hand. Brush eggplant, zucchini, squash and pepper with oil and sprinkle with remaining salt and pepper. Place pepper pieces skin down, eggplant, zucchini and squash on the grill. Grill 8 minutes or until tender, turning once.

4. Combine cheese and herbs. To assemble the stack, place a slice of eggplant on a plate. Top with one fourth the cheese mixture. Lay a strip of zucchini and yellow squash side by side. Drizzle with 1 1/2 tsp of balsamic reduction. Top with a slice of pepper and another slice of eggplant and drizzle another 1 1/2 tsp of balsamic reduction. Repeat procedure three more times with remaining vegetable slices and cheese, let stand for 5 minutes and then serve.

Tuesday, June 26, 2007

Almond-Apricot Chicken


I have a small confession to make....I am not a fan of Martha Stewart. I am sure I am not the only one and its not that I have anything against her personally, its just I don't think she's that good. I feel like her popularity has made her sell out and that as a cook, she is not in the same league as the likes of Donna Hay, Nigella Lawson, Giada DeLaurentis etc.

Having said all that though, I picked up her new book, Good Food Fast, and its pretty good. Fortunately for Martha, the book store I purchased it from had placed a sticker over her name, otherwise I never would have given it a second look. Instead, under the guise of anonymity, I picked this book off the shelf to flick through and to my pleasant surprise, it was set out in seasons. I have been on a quest since reading Vegetable, Animal, Miracle by Barabara Kingsolver (kindly recommended to me by Katie over at Other People's Food), to eat more locally and seasonally, so this appealed to me very much. I purchased the book and upon closer inspection, not all of the recipes contain seasonal ingredients, more that the recipes suit the season....however, it still has a lot of merit and each recipe is accompanied by a lovely photograph....always a must for me :)

Anyway, so the recipe I made tonight comes from this book and was absolutely fabulous. I also made some beef tacos with radish and avocado salsa last night from this book (but did not have a chance to blog about), which were equally great.

I loved stuffed chicken and I love goat's cheese and this recipe had both. Combined with the apricots, this chicken was very moist and extremely tasty. The recipe suggest serving with a mint pesto, but instead I sauteed some different types of squash that I picked up at the farmer's market this weekend with some olive oil, garlic and some special pesto genovese.....a lovely gift from a friend who wed in Italy and brought this back for me. I also served some garlic bread from Wholefoods Market.

I would absolutely make this meal again, it was really wonderful....maybe I was too harsh on old Martha. I will certainly be making some more recipes from this book in the future.

Almond-Apricot Chicken
(Serves 4)

4 boneless chicken breast
1/2 cup sliced almonds
2 oz goats cheese
6-8 dried apricots, cut into 1/4" pieces
course salt and freshly ground black pepper
1/3 cup plain bread crumbs
1 large egg, beaten
1 tbs olive oil

1. Pre-heat the oven to 375F. Cut a slit in one side of each chicken breast to create a pocket about 4 inches long.

2. In a small bowl, combine a 1/4 cup the almonds with the goats cheese and apricots. Stuff each breast with 1/4 of the mixture. Season with salt and pepper.

3. On a plate, combine bread crumbs and remaining almonds. Dip each breast into the beaten egg and then dredge in the crumb mixture.

4. Heat the oil in a large non-stick skillet over medium heat and cook chicken until golden, about 3-4 minutes on each side. Transfer to oven and bake until cooked through, about 15 minutes.

Monday, June 25, 2007

Apple of My Eye


When I saw that this month's edition of Sugar High Friday was your favourite, most craved dessert, it took me all of about 2 seconds to know what I was going to make. Now don't get me wrong, I love all types of desserts from pavlova, to tarts, cakes, pies, ice cream, biscuits, scones.....you name it, I probably love it. I have a very over-active sweet tooth!! But invariably when we go out to dinner, I always scan the dessert menu for one thing...apple crumble!! If there is an apple crumble, or actually any kind of crumble, I am all over it. I love them....they could be of the crumble variety, the crisp variety, in peach, blueberry, strawberry, rhubarb.....but if there is an apple crumble, I cannot go past it.


Yet, I have never ventured to make my own version and figured this would be the perfect opportunity to give it a go. I did not find my recipe in any one place, instead borrowed lots of different bits from lots of different recipes to come up with my own. See, I love the cinnamon-y, apply goodness of the filling, but it has to have just the right crust and of course, caramel. It isn't as good as it can be without caramel, as apples and caramel are just a match made in heaven.

I really wanted to make my own vanilla ice cream to go with this as well, but unfortunately due to time restraints in the last couple of weeks, the props for the ice cream has to go to Mr Haagen Daas. Oh well, the rest is all me and can I just say....this crumble was really great. I have many in my time and I don't know if I would go as far as saying it is the best....but it sure is up there.

Thanks Jennifer for prompting me to come up with my own apple crumble recipe, so now I can enjoy it whenever the craving hits. Yum!!


Apple Crumble with Caramel Sauce
(Makes 6)

Apples
6-8 granny smith's, peeled, cored and chopped
75g unsalted butter
1/4 cup brown sugar
1tsp cinnamon
1tsp allspice or nutmeg
2 tbs lemon juice
zest of one lemon
Crumble
50g pecans
50g rolled oats
1/2 cup self raising flour
100g melted butter
1/3 cup brown sugar
1/2 tsp cinnamon
pinch allspice
Caramel Sauce
1/2 cup butter
1 cup packed brown sugar
1/2 tsp salt
1 1/2 tsp pure vanilla extract
1/2 cup evaporated milk

ice cream to serve

1. To make apples, melt butter in a deep pan over medium heat and add apple. Cook for 5 minutes or until they start to soften, the add brown sugar, lemon juice, zest and spices and simmer for 10 minutes or until tender. Transfer to 6 one cup capacity oven proof dishes.

2. For the crumble, process the pecans in a food processor until finely chopped, then combine with flour, oats, sugar and spices. Melt the butter and mix into the pecan mixture until all ingredients are moistened. Spread over apples and bake at 350F for approximately 40 minutes or until golden.

3. To make the sauce, in a small saucepan, melt butter with the sugar and salt over medium heat. Bring to boil, whisking constantly. Remove from heat and whisk in the vanilla and evaporated milk. Set aside and keep warm.

4. To serve, spoon vanilla ice cream over apple crumble, then top with caramel sauce.

Friday, June 22, 2007

Fava Bean and Goat's Cheese Crostini


I had originally planned to serve these crostini's with a browned butter and sage spaghetti, but after having an enormous lunch, I wasn't that hungry. However, the crostini by themselves were the perfect light snack and were absolutely delicious. I had expected them to be good, but they far exceeded my expectations. Yum!! The color is gorgeous as well, making these perfect to serve to guests. You could make little appetizers by putting the topping on mini toasties, or just serve the whole crostini with a soup, salad or gazpacho. These definitely get 2 thumbs up from me.


Fave Bean and Goat's Cheese Crostini
(makes 4)

4 slices of rustic bread such as ciabatta
3oz goat's cheese
1lb fresh fava beans
1 clove garlic, crushed
tbs lemon juice
1/4 cup grated parmesan cheese
salt and pepper to taste
about 1/4 cup of olive oil

1. Bake the bread at 350F for approximately 5 minutes, or until golden.

2. Remove fava beans from pods, then boil for about 2 minutes. Remove beans from soft white shell and add to a food processor. Place the rest of the ingredients except olive oil into the food processor. Turn the processor on, the drizzle oil through feed tube until beans turn into a smooth paste.

3. Spread goat's cheese onto each piece of bread, then top with fava bean mixture. Serve.

Thursday, June 21, 2007

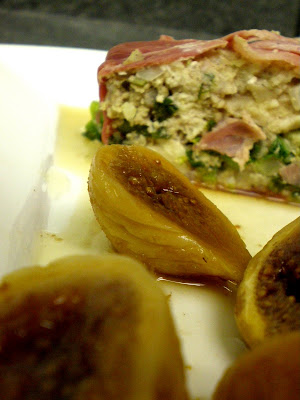
Chicken, Fennel and Rapa Terrine with Drunken Figs


The inspiration for this meal came from the May 2007 edition of Food and Travel, a great UK magazine that combines two of my favourite things!! There are some really great recipes in this magazine, but I have to say this wasn't really one of them. In all fairness, I changed the recipe a lot, but I just think that a meat based terrine is just not my cup of tea.

Now, don't get me wrong, this was not a bad recipe, hence I am still posting it. The original was made with pork, fennel seeds and spinach, but I changed out the pork for chicken (as that's what I had), used fresh fennel instead of seeds and used Italian rapa greens from my CSA box instead of spinach. But really, you could use any greens you like I think (chard, kale, mustard greens etc). I also used prosciutto instead of streaky bacon and served the terrine warm instead of cold.

This was not a weeknight friendly meal and I had actually planned to make it last weekend. However, our kitchen renovation put the kibosh on that and I decided to make it tonight as I had a bit of extra time. Personally I don't think the effort was worth it, but I don't want to be so negative as to turn off anyone else who might like to make this dish.

Chicken, Fennel and Rapa Terrine with Drunken Figs
(serves 4)

2 bay leaves
150g prosciutto
200g Italian rapa, chopped (or any other leafy green)
2 tbs olive oil
1 small onion
1 small fennel bulb (or 1/2 a large)
2 garlic cloves, finely chopped
300g minced chicken
200g chicken breast, coarsely minced
1/2 tsp ground nutmeg
1/2 tsp ground allspice
1 tsp sea salt
1/2 tsp black pepper
20 dried figs, halved
1 cup Marsala wine

1. To make drunken figs, put the figs, Marsala and 4 tbs water in a saucepan and bring nearly to boiling point. Remove from heat, cover and leave to cool. Can be stored in an airtight container in the fridge for up to 2 weeks.

2. Pre-heat the oven to 350F. Oil a small terrine or loaf pan with canola oil. Arrange the bay leaves on the bottom and then lay the prosciutto across the width. Put the rapa in a colander and pour over boiling water to blanch. refresh with cold water and squeeze out any excess and set aside.

3. Heat the olive oil in a frying pan over low heat and saute onion, garlic and fennel for 10 minutes, or until soft but not brown. Transfer to a large bowl with half the spinach, the chicken, nutmeg, allspice, salt and pepper. Mix together well.

4. Put half of the chicken mixture in the prepared terrine and press down firmly. Top with remaining spinach, then the remaining chicken mixture. Press down firmly, then fold over the overhanging prosciutto. Firmly cover with oiled foil and put in a baking dish. Fill the baking dish with enough water to come halfway up the sides of the terrine. Bake in the oven for an hour. Either serve warm, or place in the fridge with a weight on top for up to 2 days before serving.

5. Serve the terrine with drunken figs.

Wednesday, June 20, 2007

(Another) Salad and Frittata


The recipe for this frittata came from Donna Hay Magazine, issue 32 and was really great. Sometimes I love eggs, whereas other times I just can't deal with them. I wasn't sure what this one would be like and if I would really like it, but it was fabulous. A little more calories than I would normally like, as there was some cream and cheese, as well as the eggs, but the recipe served four, so its not too bad. And it had lots of veggies.

I served the frittata with yet another salad, this one from Jamie Oliver's The Naked Chef Takes Off. It was a watercress, arugula, pear, walnut and parmesan salad. You don't really need a recipe as the name says it all. The only addition is to add some olive oil, lemon juice, salt and pepper to dress.


Pea, Pancetta, Leek and Onion Frittata
(Serves 4)

3/4 oz unsalted butter
2 tsp olive oil
1 brown onion, sliced
1 leek, sliced
6 eggs
1 cup single pouring cream
1/3 cup grated parmesan cheese
sea salt and cracked black pepper
7oz ricotta cheese
1 cup frozen peas, defrosted
5 slices pancetta, roughly chopped

1. Heat an 8 1/2" pan over medium heat. Add the butter and oil and swirl in the pan to coat. Add the onion and leek and cook, stirring for 5 minutes or until soft. Place the eggs, cream, parmesan, salt and pepper in a bowl and whisk to combine. Reduce heat to low, pour over the egg mixture and cook for 5 minutes or until the edges start to set. Top with ricotta, peas and pancetta and cook for 15 minutes or until the egg is almost set.

2. Place under a pre-heated broiler (grill) for 5 minutes or until the egg is set and the top is golden.

Tuesday, June 19, 2007

Japanese Style Steak Salad


As the thermometer pushed 100F today, it seemed like the only logical choice for dinner was a salad. This one comes from Jamie Oliver's Jamie's Dinners and was absolutely delicious. The only changes I made to the recipe were to add some mixed salad greens (heirloom lettuces and arugula), as I wanted more greens than Jamie originally included. The tahini sauce went fabulous with the steak and radishes and was a bit different from your regular oil and vinegar based dressings.

This is definitely a keeper and was great for a summer evening in 100F and (still!!!) no airconditioner.

Japanese Style Saturday Night Steak
(Serves 2)

1 large sirloin steak
1/2 a daikon
1 small bunch of fresh radishes
1 fresh red chilli
1 small bunch of fresh cilantro
2 large handfuls or salad greens
2 tbs water
2 tbs tahini
1 tsp soy sauce
juice of one lime
sea salt and freshly cracked black pepper
olive oil

1. Take steaks out of the fridge 15 minutes before you want to cook them. Peel the skin off the daikon, then continue to peel long strips off it and place in a bowl. Slice the radishes into fine rounds, de-seed the chilli and slice thinly and place both in the bowl. Tear the cilantro into pieces and place in the bowl.

2. Add water to the tahini and mix until its a smooth paste. Stir in the soy sauce and lime juice and mix until smooth.

3. Heat a frying pan and season steaks with salt and pepper. Rub in a little olive oil and place it in the pan. Fry for about 10 minutes, turning steak every minute and lowering heat to medium after the first minute. Rest the steaks for a couple minutes before slicing them thinly. Tip any juices from the steak into the tahini and mix.

4. To serve, dress the salad with the sauce, add the steak and toss. Place half on each plate.

Monday, June 18, 2007

Fava Bean and Arugula Risotto


Wow, what a crazy weekend in the bear household!! Our kitchen renovation is in full swing, so a lot of the things I wanted to make this weekend did not materialize. We no longer have any wall cabinets, but thankfully I still have a working stove and sink.

Tonight's recipe utilizes some of our CSA fava beans, onions and arugula. I love risotto and this was a great way to use some of our produce. I have never had fresh fava beans before and whilst they were a little time consuming to prepare, the taste was definitely worth it. Very tasty and fresh.

I am not going to post a formal recipe as most people know how to make a basic risotto, however I started with some onion, garlic and white wine, expanded the rice with vegetable stock and then added the fava beans and arugula, as well as some Peccorino, at the end.

To prepare the fava beans, peal the vein on the bean pod and then remove the beans from the pod. Boil for1-2 minutes and then pop each bean out of its milky casing.

Just as an aside, after two weeks of receiving produce from my CSA farm, I have started to find that my grocery bill has gone down significantly. Amazing that such fresh food that is so much better for you and better tasting can be loads cheaper than the supermarket crap that travelled halfway across the world to get there....just another reason I am glad to have joined this program :)

Friday, June 15, 2007

HHDD #13 - Sorbet


When I saw that this month's edition of Hay Hay it's Donna Day, hosted by Laura over at Eat Drink Live, was sorbet I had mixed emotions. I do love sorbet, but how was I going to make it special.

Then, fortuitously, on the same day I got an email from my CSA farm (Even' Star Organic Farm) that said I would be receiving some lavender in this weeks share. It also stated that "foodies" might like to use it an ice cream recipe. Perfect!! I decided to use my lavender for this sorbet recipe and also serve it alongside some lavender and almond biscotti.

I love the smoky taste of lavender. My favourite tea is lavender Earl Grey and I make a killer lavender shortbread, if I do say so myself. It works really well in this milk and honey lavender sorbet, with the smokiness offset by the sweetness of the honey. There is also just a hint in the biscotti, which seems like the perfect accompaniment to his fabulous sorbet.


Milk and Honey Lavender Sorbet
2 cups whole milk
2 cups water
1 cup honey
1/4 vanilla bean, split lengthwise, seeds scraped
1 tbs dried lavender buds, slightly crushed
pinch of salt

1. Combine milk, water, honey, vanilla pod and seeds in a medium saucepan. Bring to a simmer over medium heat, stirring to dissolve the honey. Bring to a boil, whisk in the lavender and salt, then remove from heat. Infuse mixture for 30 minutes, then strain through a fine sieve and chill in the refrigerator for at least 3 hours.

2. Transfer mixture to ice cream machine and freeze as per manufacturers instructions.


Lavender and Almond Biscotti
(Makes 30-40)

1 cup sugar
1/2 cup (1 stick) of butter, softened
1 tsp vanilla extract
1 tsp almond extract
4 medium eggs
3 cups of flour
1 1/2 tsp baking powder
1/2 tsp salt
2 tsp dried lavender buds, finely ground
1/2 cup sliced almonds

1. In a large bowl, cream together butter and sugar until smooth. Mix in extracts and eggs and blend until combined. In a medium bowl, combine flour, baking powder, salt, lavender and almonds. Stir into sugar mixture and mix until just combined. Do not over mix.

2. Pre-heat oven to 350F. Halve dough and turn out onto a cookie sheet. Dough will be sticky. Without handling dough excessively, pat the dough into two 13"x2" logs. Place the logs 3" apart. Smooth each log and place in the oven for about 20 minutes, or until lightly browned.

3. Cool for 10-15 minutes and reduce oven temperature to 300F. After cooling, cut diagonally into 1/2" slices with a serrated knife. Lay slices on cookie sheet and return to the oven for 8 minutes. Turn slices over and bake for another 7 minutes until golden. Transfer to a rack and cool completely. Stores for up to one month in an air tight container.


(recipe adapted from http://www.gildedfork.com)

Thursday, June 14, 2007

CSA - Week 2


Its amazing what a difference a week can make in the world of farming and fresh produce. Our weekly share this week was completely different from last week and we got lots of great stuff. The only similarities were that we got another 2 heads of heirloom lettuce, plus some lavender, fennel, arugula, fava beans and onions. Whoo hoo!! I also picked up a dozen fresh eggs from the farms free range chickens.

There should hopefully be some great recipes with all of this produce, so look out next week for a risotto, a frittata, a terrine and some great salads :)

Wednesday, June 13, 2007

Veal with Lemon and kale


Tonight's dinner is adapted from a recipe in Donna Hay Flavors. I wanted something that I could serve with my enormous bag of CSA Kale and this seemed to fit the bill perfectly. The lemon gave a lovely tang to the dish and it was very quick, healthy and tasty.

This was my first time cooking kale and I didn't know what to expect. I was absolutely delighted when I put it in the pan and it turned from a dull, grey/green to the most vibrant, brilliant shiny green. Gorgeous! And it tasted great as well, not bitter at all. A little chewy in texture, but still delicious.


Veal with Lemon and Kale
(Serves 2)

1 tbs olive oil
1 tbs butter
shredded lemon rind of 1 lemon
1 tbs lemon juice
1 tbs oregano leaves
2 veal loin chops
cracked black pepper
greens
2 tbs of olive oil
4 cups of kale
1 medium onion, sliced
2 cloves of garlic, crushed
1 tbs lemon juice

1. Place oil and butter in a frying pan over low-medium heat. Add lemon rind, juice and oregano leaves and cook for 3 minutes or until leaves are slightly crisp. Remove lemon and oregano mixture and set aside.

2. Increase heat to high. Sprinkle the steaks with pepper and add them to pan. Cook for 2 1/2-3 minutes each side or until cooked to your liking.

3. In the meantime, heat another pan on high and heat oil, onion and garlic. Add Kale and cook for about 2 minutes until kale has reduced down and is tender. Add the lemon juice and stir for a few more seconds.

4. To serve, place half the kale mixture on each plate, top with veal chop and then sprinkle the lemon and oregano mixture over the top.

Tuesday, June 12, 2007

Mammoth Burgers


Whilst the title of this post may sound like I am making burgers from (albeit extinct) mammoth meat, I assure you that no mammoths were harmed in the making of this meal!! The actual title of this dish from Jamie Oliver's The Naked Chef Takes Off, is a Botham burger. For those of you who did not grow up with an intimate knowledge of cricket, Ian Botham was a very famous English bowler and Jamie's dad invented this burger that he says is the size of a cricket ball. That is an understatement! This thing is huge...one might even say, mammoth!! But very delicious.

I served my Botham/mammoth burger on a bun with some melted cheddar, sliced locally grown tomato, sauteed onions, pickle, lettuce, ketchup (tomato sauce) and mustard.....yum! I also added some of my fresh CSA parsley and Italian rapa to the burger so that I could pump up the vitamin content and use up some of my greens.

I served the burger with a side salad made from my CSA heirloom lettuce, red onion, sliced pear, some raspberries, tomatoes, blue cheese and raspberry vinaigrette.

This was meant to be a great summer evening meal....until a huge thunderstorm rolled in and we could no longer eat out on the deck. At least the meal was still delicious.

Botham Burger
(makes 2)

1lb ground beef (preferably organic)
1 medium red onion, finely chopped
1 large egg
a handful of fresh breadcrumbs
1/2 tbs coriander seeds, crushed
small pinch of cumin seeds, crushed
1 tsp Dijon mustard
1 tsp fresh parsley
1/2 cup chopped fresh Italian Rapa
salt and freshly ground pepper

1. Pre-heat oven to 450F. Mix all ingredients in a bowl, then form into 2 giant patties. Place in the oven and roast for about 25 minutes, which should leave the middle slightly pink and the outside crispy.

2. Serve with whatever burger fixins' you like.

Monday, June 11, 2007

Linguine with Spicy Leek and Tomato Sauce


I found this recipe whilst looking for something to do with my CSA leeks.. It comes from the June edition of Bon Appetit and was perfect to utilize my leeks and also some locally grown tomatoes that I picked up at the market. I had originally thought I would end up doing a fritatta or a risotto with the leeks, but when I saw this recipe, I thought it was something a little different and really made great use of the fresh seasonal produce.

The result was a lovely, sweet and fresh pasta. A perfect spring/summer dish.

Linguine with Spicy Leek and Tomato Sauce
(Serves 4)

2 tbs olive oil
2 garlic cloves, chopped
1/2 tsp dried crushed red pepper
1/2 tsp fennel seeds
2 medium leeks, split lengthwise, sliced crosswise and rinsed to remove grit
1 1/4 tomatoes, diced
1/2 cup dry white wine
1 tbs white wine vinegar
12oz linguine
1/2 cup freshly grated parmesan cheese

1. Heat oil in a large skillet over medium-high heat. Add garlic, red pepper and fennel seeds and saute for 1 minute. Add the leeks and cook until they begin to soften. Add diced tomatoes and cook for another minute. Add wine and vinegar, bring to a boil, then cover and cook until tomatoes break down, stirring often, about 5 minutes.

2. Meanwhile, cook pasta per package directions. Drain and add pasta to the sauce in the skillet. Toss to coat, then add cheese and salt and pepper to season. Serve and garnish with a little more grated parmesan.

Sunday, June 10, 2007

Strawberry Rhubarb Crisp


A couple of weeks ago, Katie from Other People's Food recommended a fabulous book to me called Animal, Vegetable, Miracle, by Barbara Kingsolver. It documents the story of one family trying to live off the land and all local food for a year and also has a lot of valuable information on buying local produce, growing various vegetables and fruits as well as sustainable farming practices. Really interesting!

The recipe for this strawberry rhubarb crisp comes from the book and I wanted to make it this weekend as this is the last week of the strawberry season around here and I had also picked up some magnificent looking rhubarb at the farmers market yesterday.

The resulting crisp was very yummy (although there was a lot of liquid). A very unique flavor, but the sweetness of the strawberries and the tartness of the rhubarb worked great together.


Strawberry Rhubarb Crisp
3 cups strawberries, rinsed, hulled and halved
3 cups rhubarb, chopped
1/2 cup honey
topping
1/2 cup flour (I used white whole grain)
1/2 cup oats
1/2 cup brown sugar
3/4 tsp cinnamon
1/2 tsp allspice
1/3 cup butter

1. Mix the strawberries, rhubarb and honey together and then place into an 8" baking dish.

2. Add remaining ingredients into a bowl and mix together with fingers until a crumb texture forms. Spread the topping over the fruit mixture and bake for 40-50 minutes at 350F.

3. Serve with vanilla ice cream if desired.

Aubergine rolls with Foccacia Bread


Tonight's (not particularly photogenic) dinner is adapted from a book I have had for years, but haven't cracked open in a long time. I was actually looking for a recipe to use my lovely CSA leeks and happened upon this one instead. The book is called The Practical Encyclopedia of Potato and Rice by Alex Barker, Sally Mansfield and Christine Ingram. It is a great cook book. I have made some really fabulous risotto's from this book

The recipe for aubergine rolls is found in the rice section in a chapter on Greece, Turkey and the middle east. It suggests that this would make an interesting appetizer or part of a Turkish-style meze buffet, but I thought it would make a lovely dinner and would allow me to use some of my CSA herbs. Turns out that my foccacia dough from yesterdays bread class was an excellent addition as well!

This is a lovely, fresh, healthy meal. The tomato sauce utilizes canned tomatoes, but I had bought some local ones today from the nursery as well and added one of those for some extra sweetness and a brighter red colour. Beautiful!

Aubergine Rolls
(Serves 2 for a main, or 4 for an appetizer)

1 large eggplant
olive oil for shallow frying
1/2 cup ricotta cheese (I used fat free)
1/2 cup goat's cheese
1 cup cooked rice (I used basmati, but long grain or even brown would work)
1 tbs fresh basil, chopped
1 tsp fresh mint, chopped
salt and fresh cracked black pepper
tomato sauce
1 tbs olive oil
1 red onion, finely chopped
1 garlic clove, crushed
14oz can chopped tomatoes
1 large fresh tomato
1/2 cup chicken stock
1 tbs fresh parsley, chopped

1. Pre-heat oven to 375F. Make the tomato sauce by heating the oil in a saucepan. Saute onions and garlic for 3-4 minutes until softened. Add the tomatoes, chicken stock and parsley and bring to a boil. Lower heat and simmer for 10-15 minutes until slightly thickened.

2. Slice eggplant lengthwise into 6-8 slices (discard the end pieces). Brush olive oil on each side and fry in batches until the slices are golden on both sides.

3. Mix the ricotta, goat's cheese, rice, basil and mint, salt and pepper. Place generous portions of the cheese mixture at the end of each eggplant slice and roll up. Arrange the rolls in a shallow baking dish and pour over the tomato sauce. Bake for 10-15 minutes until heated through and garnish with mint sprigs and serve.

Saturday, June 9, 2007

L'Academie de Cuisine - Bread Making


Today I had the great pleasure of attending my first cooking class at the L'Academie de Cuisine in Bethesda, Maryland. I have been excited to take this course ever since I signed up about a month ago and today was the big day....and it lived up to all of my expectations. It was fabulous. Not only was it informative, but fun and delicious and I met some really nice people.

This course was on bread, which as I have mentioned in previous posts, is something I have only recently gotten into baking. My efforts so far haven't been too bad, with only one bad mishap with an attempt at Naan, but I certainly still have a lot to learn and I thought this would be a step in the right direction.


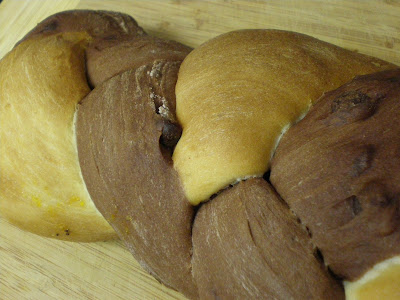
The class focused more on sweet breads, but we also made a foccacia as well. The first thing we did was to make the dough for a milk bread and also for a chocolate bread. Both are enhanced breads, but are not as rich as brioche (something I have yet to tackle, but am really looking forward to trying soon). The instructor said that the milk bread is a good substitute for brioche, when you don't want something quite as rich and when I tried this bread in its various forms I was very impressed. It was so light and fluffy, it was almost like sponge cake....lovely. And it is so versatile, you could do a million things with it.


In the class, we divided the two doughs in half and I got to take the half of the chocolate bread home, as we didn't need it. The other half of the chocolate was braided with the milk loaf, to create a fantastic, marbled looking bread. Very tasty as well.


The other half of the milk bread was used to make a poppyseed and apricot loaf, which was absolutely sensational. So, yummy and again, you could make almost any filling you wanted with this dough. We spread the dough as long as the loaf pan and about three times the width. Sprinkled poppyseeds and then spread over a dried apricot puree. The dough was then rolled up and placed in the pan to bake. This would be a perfect bread for afternoon or morning tea, but you could add any type of seed, nuts, dried fruit or fresh fruit that you wanted. You could also bake it as a loaf, or cut it up to make sweet rolls, which is what the instructor showed us with another batch of milk bread dough.


She had a pre-prepared dough that she rolled into little balls, put into a springform, then covered with streusal topping and blueberries. When this came out of the oven, it was pure heaven.

When I got home, I baked the other half of my chocolate bread. I decided to bake it like the instructor had done with the streusal rolls, so I made it into balls, put them in a springform pan and covered with raspberries. Again, a really versatile bread, that was so delicious.


Lastly, we made a walnut and raisin foccacia bread that was super tasty. We actually didn't bake the dough we made, but got to taste the one the instructor had prepared earlier, as this dough needed more rising time than the class allowed. So tomorrow I will bake this bread just before dinner, so we can have some fresh foccacia...yum!!

Hopefully this will be the first of many classes that I can take at the L'Academie de Cuisine. I am always hoping to improve my cooking skills and this was a fun, delicious way to do it :)

Friday, June 8, 2007

Coconut Blackberry Slice


Considering I am home today waiting for our air conditioner to be repaired and it is close to 100 degrees (F), it is probably not a wise thing to do some baking. But I have been waiting all week to make this slice, so I wasn't going to let a little heat drive me out of the kitchen!

This recipe comes from Bill Granger's Bills Food and is found in the afternoon tea section of the book. I just love that he includes recipes for afternoon tea! Something I definitely miss here in America. When I was doing my PhD in Melbourne, me and all of my lab mates would trot off to the break room for afternoon tea (or sometimes morning tea.....and shamefully sometimes both!) and spend fifteen minutes having a lovely old chat, sometimes with something yummy to accompany our tea or coffee.

Ahhh, memories :)............

Anyway, back to the slice. This almost turned into a disaster as I had made the crust with 4 1/2 tablespoon of butter, instead of the required 4 1/2 oz (big difference), but realized my mistake before it was too late and re-made the base before assembling and placing in the oven...whew, crisis averted. Actually, it probably wouldn't have been a crisis, because what I had made was very much like a shortbread crust, instead of the more cake like crust in this recipe. It may have been different, but probably would have tasted alright. I will never know though, as I managed to get it right and the outcome was lovely. This slice is not sickeningly sweet, with blackberries giving it a little bit of tartness against the sweetness of the jam and coconut. Lovely!! This would have gone down a treat in the break room, but instead, I will enjoy it whilst I swelter in this very warm day without my air conditioner.


Coconut and Blackberry Slice
(Makes 12-16)

base
4 1/2 oz unsalted butter
1/4 cup castor sugar
1 egg
1 tsp vanilla extract
1 1/2 cups all purpose flour
1 tsp baking powder
1/4 cup milk
filling
1/2 cup blackberry jam
1 cup blackberries
topping
3 1/2 oz unsalted butter
5tbs castor sugar
2 eggs
2 1/2 cups dessicated coconut
1/2 cup all purpose flour

1. Pre-heat oven to 350F. To make base, cream the butter and sugar, then add egg and vanilla extract and stir to combine. Sift the flour and baking powder into the mixture and stir in with the milk. Flour your hands and press the base evenly into a greased, lined 12"x8" baking tin. Spread the base evenly with the jam and sprinkle with blackberries.

2. To make the topping, cream the butter and sugar, then add the egg and beat until combined. Stir in coconut and 1 tbs of sifted flour, then the remaining flour. Spread the topping evenly over the blackberries.

3. Bake the slice for approx.30-45 minutes (depending on your oven) or until the top is golden. Cover with foil and bake for a further 5 minutes. Remove from oven and cool in the tin for 10 minutes. Cut into slices.

Thursday, June 7, 2007

My First CSA Box!!


Its exciting to see a lot of food bloggers joining up for these great programs and blogging about the produce they get and what they do with it!

I am doubly excited today because I finally got my first box from Even' Star Organic Farm. I have been looking forward to this day for about 2 months now and was not disappointed.

This weeks share consists mainly of leafy greens, which the farm has said are not standard fare for the rest of the summer, so we need to enjoy them whilst they last. Included in our share was some lovely leeks, a bag of curly Kale, 2 different types of heirloom lettuce, some English sugar peas, 2 small baby turnips, a bag of herbs containing mint, parsley and cilantro flowers and a type of Italian cooking green called trasamiento rapa. Phew! That's a lot of greens, so we will be eating healthy this week :)

One of the reasons I wanted to join up for this CSA was try and eat more seasonally and to try new things. So this week will be the first ever time I have Kale (not something that is popular in Australia....not sure if you can even get it there) and rapa, which I have never even heard of. great! I am off to rummage through my recipe books......

Wednesday, June 6, 2007

The Hubby Challenge #1 - Gunslinger Burritos


Anyone who knows me, knows that my all time favourite author is Stephen King and that his Dark Tower series of books are an obsession. For those who aren't familiar with this series of seven books by Stephen, you can check out this website. This is an amazing series of books that took Stephen three decades to write and the story is incorporated in some way into almost every other book he has written. That in itself is sheer genius!!

Anyway, the reason I bring this up is because when I was reading the last few books in the series...actually waiting agonizingly for each new one to come out and nearly having a heartache when I found out Stephen was hit by a truck and may never finish, at around book 4....I got my hubby onto them as well. We were discussing them again last week and he came up with a challenge for me....to make my own version of a gunslinger burrito.

Now, most are probably thinking what the hell is that?? And in order to answer that question, I have to refer to the story of the Dark Tower............

The main character is Roland Deshain, who is a gunslinger. The books are set in a time that is a cross between now and the old west. Roland lives in Mejis and is trained to be a gunslinger as was his father before him. However, the world is changing and the fabric of time is becoming warped. The Dark Tower, which is at the center of all universes, is dying and it is up to Roland, the last gunslinger, to get to the dark tower and fix it. This, obviously, is an epic journey that occurs over the series of seven books and is a bit like Lord of The Rings, crossed with Indiana Jones.

The gunslinger burrito, mentioned above, is the meal of choice for Roland on his journey as he has to eat whatever he can find. He usually makes his burrito with some sort of animal meat (that he has killed) wrapped in a leaf. Not particularly appetizing...so I asked hubby if he wanted an authentic gunslinger burrito (hoping of course the answer was no)...and thankfully, he said he just wanted me to come up with my own burrito recipe that we could affectionately call a "gunslinger burrito".

Yes we are dorks...I'll freely admit it. But you gotta keep life interesting :)

At first I had no idea how to make an interesting burrito, but I knew I liked Chipotle burritos and wished to emulate something like that. For those not in the US, Chipotle is a chain that sells organic, environmentally friendly burritos and is super yummy. I particularly like their Barbacoa beef burrito, which is lovely and spicy.

So, after researching a fair bit on the web about what makes up the Barbacoa beef in a Chipotle burrito and switching it up to my own particular tastes, I hereby present my answer to Hubby Challenge #1 - The Gunslinger Burrito!!!

Gunslinger Burrito

Beef
4-6 Chipotle Chile's in adobo sauce (canned)
2 teaspoons of ground cumin
1 tsp ground cloves
1 tsp allspice
zest of one lemon
4-6 sprigs of fresh thyme
6 cloves of garlic, crushed
1 Spanish onion, roughly chopped
1/3 cup cider vinegar
2-3lb beef roast
salt and pepper
bay leaf
3 star anise
1 cup chicken stock

Cilantro-Lime Rice
1 cup basmati rice
juice of one lime
1 tbs extra virgin olive oil
1/4 cup fresh cilantro, chopped
salt and pepper to taste

Guacamole
3 ripe avocados
2 tbs minced onion
1 small garlic clove, minced
1 small Serrano chili, seeded and minced
1/4 cup fresh cilantro, chopped
1/2 tsp ground cumin
2 tbs fresh squeezed lime juice
salt to taste

salsa
2 large ripe tomatoes, seeded and cored
1 small jalapeno, seeded and minced
2 tbs red onion, minced
1 small clove of garlic, minced
2 tbs freshly squeezed lime juice
salt to taste

large flour tortillas
shredded cheddar cheese
sour cream


1. To prepare the meat, place all ingredients into a slow cooker, then cook on low for 6-8 hours. remove meat from juices and shred with a fork. Drizzle some of the pan juices over the meat and set aside.

2. Cook rice as per packet instructions, then add oil, juice and salt. Allow to cool slightly then add cilantro.

3. To make guacamole, halve the avocados, remove the pits and dice. Place into a large bowl and mash together with onion, garlic, chili, cilantro, salt and cumin. Add the lime juice and stir to combine. (Will keep in the refrigerator for a day or two).

4. For the salsa, finely dice the tomatoes. Place in a bowl with jalapeno, onion, garlic and lime juice. Season with salt and set aside.

5. To serve the burritos, place desired amount of meat, rice, guacamole, salsa, shredded cheese, sour cream and shredded lettuce onto a flour tortilla. Wrap the tortilla around the filling and place on a plate. Alternatively, serve ingredients in individual bowls on the table and let people make their own with whatever ingredients they choose.

An Amazing Book...An Even More Amazing Man


I just wanted to take a minute to bring a book that I have just finished reading to the attention of those who sometimes frequent, or just stumble upon, my blog.

The book is "Three Cups of Tea", a bestseller by Greg Mortenson and David Oliver Relin. It outlines the accomplishments of mountaineer, Greg Mortenson and his quest to improve the lives of the people, especially the girls, living in the impoverished highlands of Pakistan and Afghanistan through education and building schools.

This guy is the most amazing person I have ever read about and I think this book should be mandatory reading for all! His philosophy of spreading peace through education is truly remarkable and the way he has been able to garner the respect of people who in general "hate" the western world is nothing short of a miracle.

This is the story of how one person truly can change the world. I was shocked that I didn't know about the accomplishments of Mr Mortenson before I stumbled inadvertently upon this book.

I too am only one person and I know that I cold never hope to change the world like this man....however, if I can do one small thing and encourage people to read this book, then I feel like have done a good deed.

From the back cover:

"Here (in Pakistan and Afghanistan), we drink three cups of tea to do business; the first you are a stranger, the second you become a friend and the third, you join our family and for family we are prepared to do anything - even die."

- Haji Ali, Korphe Village Chief, Karakoram Mountains, Pakistan


In 1993 a mountaineer named Greg Mortenson drifted into an impoverished Pakistan village in the Karakoram mountains after a failed attempt to climb K2. Moved by the inhabitants' kindness, he promised to return and build a school. Three Cups of Tea is the story of that promise and its extraordinary outcome. Over the next decade Mortenson built not just one but fifty-five schools - especially for girls - in the forbidding terrain that gave birth to the Taliban. His story is at once a riveting adventure and a testament to the power of the humanitarian spirit.


I don't really like to promote too many things on my blog, but this is seriously the best book I have ever read and I don't think you can read it without it touching your heart and changing how you see the world!!

Tuesday, June 5, 2007

Chicken and Caramelized Pineapple Pizza


There are 2 different types of people in this world. Those that like pineapple on their pizza and those that don't. It doesn't seem to me that there are too many in between. People who are "anti- fruit on their pizza" are violently opposed to the addition of pineapple and will never be swayed.

Me...I am on the side of the pineapple lovers. Please no hate mail...there is room in the world for all of us!. One of my favourite types of pizza is the Hawaiian, so when I saw this recipe for chicken and pineapple pizza in Trish Deschain's book "Caramel", I knew I would love it. I wasn't sure about hubby, but he surprisingly liked it and that means quite a lot, as he is the biggest pizza snob I know.

A couple of things about my version of the pizza. I did not use a typical pizza base, but instead used individual pita pockets. They are a little healthier than a regular pizza base. The recipe also called for smoked chicken, which I didn't have. I did however, have a leftover chicken breast, so this was a great way for me to use that.

Never one to just throw a piece of pizza on a plate and call it dinner, I added a salad to at least try and make this meal more healthy. All in all a very yummy meal. The caramelized pineapple was fabulous, so if you do not sit in the "anti-fruit" camp, definitely try this!

Chicken and Caramelized Pineapple Pita Pizza
(Makes 2)

2 pita pockets
4 tbs tomato paste
1 chicken breast
1/2 pineapple
2 tbs butter
2 tbs granulated sugar
4oz fresh mozzarella

1. Pre-heat the oven to 425F. Place pita pockets on a baking sheet with non-stick paper. Spread over 2 tbs of tomato paste on each pocket.

2. Dice chicken finely, then saute in cooking spray for a few minutes until browned. Set aside. Add butter to pan and melt. Add pineapple and saute for a couple minutes, stirring occasionally. Whilst pineapple is cooking, add sugar and continue to stir so that the sugar caramelizes. Continue cooking until caramel thickens.

3. Sprinkle chicken evenly over pita pockets. Add pineapple, then spread sliced mozzarella evenly. Place in the oven for 15-20 minutes. Don't let the pineapple burn.

4. Serve with salad.

Monday, June 4, 2007

Seared Tuna Salad with Fennel and Lemon dressing


Where did the time go?! I ended up making dinner tonight much later than I planned, so I had to make some adjustments, but thankfully they didn't effect the overall dish.

I made this seared tuna salad tonight from Bill Granger's Bills Food, but as I just mentioned, had to tweak it a little bit. This recipe is actually found in the lunch section, but I thought it would be good for a summer dinner and also to use up some tune I had left in the freezer.

The first change I made was to cook the tuna a little more than suggested. Bill asks for rare tuna, cooked 20 seconds on each side, however hubby does not like his tuna that rare, so for his benefit, I seared for about 2 minutes on each side until it was done on the outside, but still blushing on the inside. Next Bill suggests leaving the tuna to sit for about an hour, however I didn't have the luxury of that much time, so mine only sat for about 5-10 minutes. To me, it made no difference.

Lastly, the lemon was supposed to be segmented for the dressing, however again, I didn't have time for this fiddly task and just added the juice of the whole lemon instead. Again, this didn't seem to make a difference and it actually gave the whole salad a lovely tang.

All in all, this recipe actually exceeded my expectations and was a great salad :) Healthy too....always a bonus!

Seared Tuna Salad with Fennel and Lemon Dressing
(Serves 4)

1 tbs olive oil
500g tuna cut into large batons, roughly 5cm
1 tbs sea salt
freshly ground black pepper
11oz green beans
1 baby romaine lettuce
2 heads of Belgian endive, broken into leaves
1 baby fennel bulb, sliced thinly
lemon dressing
1 lemon, juiced
3 tbs capers, rinsed
1/4 cup olive oil
sea salt
freshly ground black pepper

1. Brush tuna with olive oil and season with salt and pepper. Heat a large non-stick skillet over high heat, add tuna and sear for 1-2 minutes per side (depending on how raw you like it). remove from the pan and cut into 5mm slices.

2. Blanch the beans in boiling water, then refresh in cold water to cool. Arrange the lettuce, endive, fennel and beans on plates, top with tuna. Sprinkle over lemon dressing.

3. To make dressing, mix all ingredients in a bowl.

Sunday, June 3, 2007

Cannelloni and Salad


Whew!! What a weekend. We have officially started renovating our kitchen :) I am very happy about this as our kitchen drives me mad! However, this will be a really big project and may impact some of my cooking for the next 6 weeks or so. At the moment, all of my cooking appliances are still in tact, so I can still make some decent meals.

I was looking for a recipe this weekend that would utilize the rest of the tomato sauce I made the other week. I found a recipe for cannelloni in Bill Granger's Bills Food and this was our dinner tonight, served with a side salad.

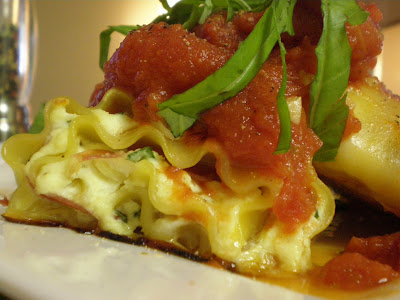
First off, I think I have discovered that Australian and American lasagne sheets are distinctly different. I believe the Australian ones are thicker, allowing them to be rolled up along the long axis. American ones are quite thin, meant to be laid side by side, hence rolling them along the long axis is impossible. Therefore, my cannelloni rolls were somewhat different to Bill's, but still tasted great, I thought. As I mentioned above, I also used the tomato sauce I made from Jamie Oliver's recipe, rather than the one that came from Bill in this recipe.

The cannelloni turned out great. I rolled them into almost a "rollotini" and served 2 per person. I think the ruffled edges gave a nice touch as well. Then I threw together a tossed salad of arugula, tomatoes, onion, walnuts, red pepper and nectarines.

This was a lovely recipe from Bill's book. I loved the addition of the prosciutto to the cannelloni. Very tasty and hubby asked for seconds, so it got his thumbs up :)


Cannelloni with Fresh Tomato Sauce
(Serves 4)

1 lb of ricotta
1/4 cup grated parmesan
2 tbs chopped fresh flat-leaf parsley
1 tsp chopped fresh oregano
2 tbs chopped fresh basil
2 eggs, lightly beaten
salt and pepper
8 lasagne sheets
2 tbs olive oil
8 slices prosciutto
cooking spray
basil leaves to garnish

1. Pre-heat oven too 400F. Stir together the ricotta, parmesan, herbs, eggs, salt and pepper in a bowl.

2. Cook the lasagne sheets as directed then cool in a bowl of cold water and olive oil. Drain lasagne sheets on paper towel. Place a slice of prosciutto lengthwise on each slice, then spread 2 tbs of ricotta mix on top. Roll up lasagne sheet and place into a baking dish coated in cooking spray. Place remaining rolls in a single layer, then coat with cooking spray. Bake in the oven for 25 minutes or until puffed and slightly crispy.

3. Whilst the cannelloni is cooking, prepare your tomato sauce as desired and make salad.

4. To serve, place 2 cannelloni rolls on each plate, cover with tomato sauce. garnish with basil leaves and serve with salad.

Friday, June 1, 2007

Thai Chicken Salad


This recipe was loosely based on a recipe in Jamie Oliver's The Naked Chef Takes Off. He has a recipe for a thai salad, but it is more of a suggestion than a recipe. He suggests a bunch of things you can put in your salad and gives a recipe for a thai dressing, so I used some of his suggestions, then decided I wanted this a main course salad, so I decided to add some chicken as well.

I guess what I am saying is you could add almost anything to this salad, so I am not going to post a formal recipe. Instead, I'll list what I used, but its also merely just a suggestion and could be changed to be whatever you wanted it to be.

The salad I made consisted of baby spinach, arugula, red and green pepper strips, mung bean sprouts, chopped green chilli, cilantro, mint, sesame seeds, scallions and some shredded chicken breast that was cooked on the grill. The dressing was made from lime juice, olive oil, sesame oil, soy sauce, ginger, garlic, cilantro and chilli flakes.


This was really easy to throw together and perfect for a summer evening out on the deck sharing a bottle of lovely Spanish red wine. Happy Friday!!!